
How would you achieve the following screen?
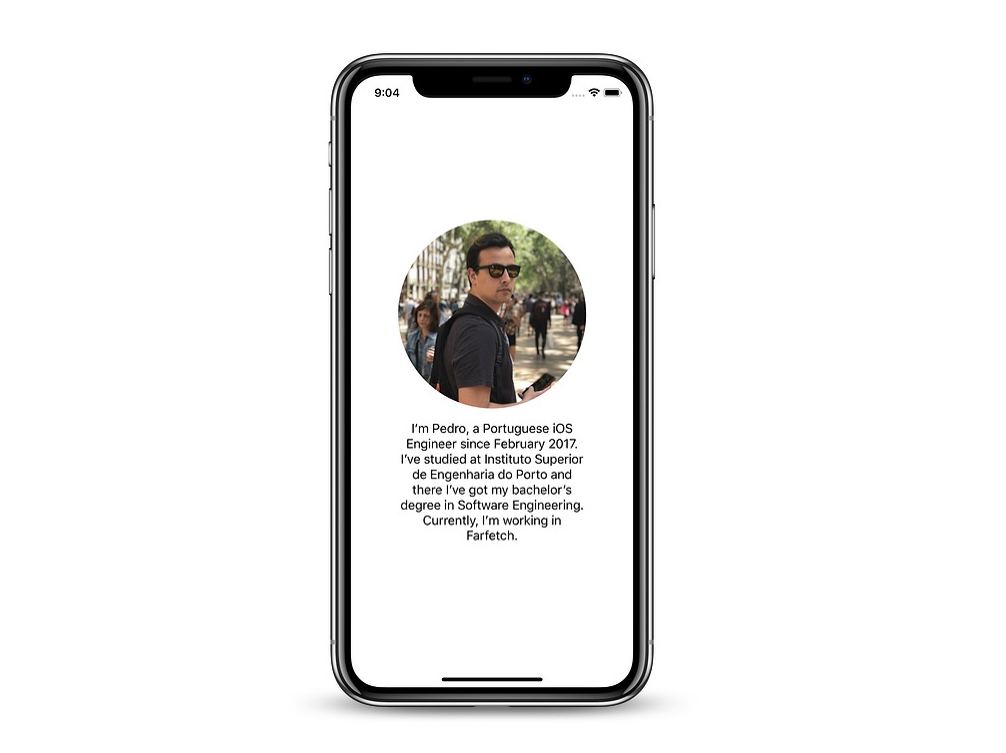
You can easily spot an UIImageView and an UILabel centered together.
There are multiple approaches to this problem and the most obvious would be to insert these two elements in a UIStackView. But what if, in a more complex layout, you weren´t able to use it? The most common approach, although not the best, would be encapsulating the UIImageView and the UILabel inside a UIView.
In this article, you’ll learn how to approach this problem in this scenario.
I’m Here to Guide You!
In iOS 9.0, Apple introduced major changes to its frameworks and added new ones. One of them was UILayoutGuide.
UILayoutGuide is a “rectangular area that can interact with Auto Layout”. It should be used to replace any UIView used for “inter-view spaces or encapsulation” since it improved efficiency and safety by avoiding the following issues regarding these kind of UIView (dummy views):
- Creating and maintaining a
UIViewimpacts performance - Each member of the view hierarchy adds overhead to every task the hierarchy performs
- A
dummyViewwill be able to intercept messages that are intended for other views
It’s also important to notice that, similar to UIStackView, UILayoutGuide cannot have a background color, among other properties.
World’s Most Famous Guide
Alongside with iOS 11, Apple introduced the Safe Area Layout Guide while deprecating the top and bottom layout guides.
According to its documentation, safeAreaLayoutGuide is “the layout guide representing the portion of your view that is unobscured by bars and other content”. It can also be confirmed in its declaration below, that safeAreaLayoutGuide truly is an UILayoutGuide:

Time to Solve Problems
With all the knowledge acquired, you are now able to solve the initial problem using UILayoutGuide instead of a dummy view.
To start off, if you were using an UIView for encapsulation, you would start by creating it and adding it to the hierarchy:
This time, since you’re using UILayoutGuide, you’ll need to create an instance of it. Then, instead of adding it by calling addSubview(UIView), you’ll be using addLayoutGuide(UILayoutGuide).
Notice that, since UILayoutGuide isn’t a member of the view hierarchy you’ll be adding your views to view instead of layoutGuide.
You’re now done with the UILayoutGuide’s initial setup and with so, it’s time to move to constraints. In the end, it is similar to what you would do with an UIView.
Keep in mind that photoImageView and introLabel setup isn’t in the scope of this article. Still, if you’re interested in it, take a look here.
Conclusion
Most of the times, you’ll end up using a UIStackView to solve problems alike but there are cases where UILayoutGuide shines. The presented problem isn’t the case and it was just used for a matter of presentation.
Unfortunately, in case you prefer working with Interface Builder, UILayoutGuide isn’t available there.
In the end, what’s your opinion of it? Did you know it or is it something new to you? Let me know it, alongside with your questions and feedback on Twitter or here.
Last but not least, I would like to praise Ana Filipa Ferreira, Tiago Silva, José Figueiredo and João Pereira for their outstanding support. ❤️
Thanks for reading. ✨